Day 7 - Jam day, shortcuts, and the path forward
I stayed awake until 7pm trying to make it playable:
And the result was that I was way too tired the day after to write this report. But, finally here it is. The completion of this seven day game planning and sprint experiment.
Results:
What I hoped for in the beginning: Trying out the node wheel gimmick in a generated context (infinite climber like)
What I did along the way: Moved the goal post much closer to myself and about 25 or so degrees off to the side.
What I got: 85% of the way there, a lot of ideas, a confidence boost and lots of lessons for the future
Production:
The difference between prototyping and production was definitely felt. During prototyping I had already come up with half a dozen interesting scenarios I could explore with my gimmicks. All that was left was to find a decent order to introduce the different aspects of the gimmick and make some levels. But I was still missing a lot of basic systems that are needed for the game to feel like... well... a game. I still needed warps, checkpoints, saving, a fixed camera, instructive text, a level class, a menu and more. I decided on making the systems as I designed the levels. In hindsight it might’ve not been the best idea to work this way since I’m the most efficient when I continuously focus on one task. But, I ended up with a total of 6 levels, and a semi-playable game. That isn't too bad a mark to land on.
In the following paragraphs I’ll discuss some of the technical things I did to optimize workflow and save some time while grinding level design.
Scene inheritance for levels:
I decided it’d be best if I prepared a sort of template for my levels before I start making them. That way I wouldn’t have to set up all the visuals every time I make a new level. I used to do this in Gamemaker by dropping the objects that I wanted to be persistent across all levels (such as particle effects or shader effects) into a room and then duplicate it. Similarly, in Godot you could duplicate a base level scene for the same effect. But this approach has some drawbacks. Imagine being 20 levels into making the game and then finding out you want to add and remove some objects that exist across all the levels. You’d have to manually add/remove them, during which you could easily mess up. In Gamemaker this issue was addressed with the new room inheritance feature. In Godot you can use – the much more general-purpose – scene inheritance feature. So I created a base scene for the levels like I would have with my previous template-approach. But this time I inherited the scene instead of duplicating it.
The base scene had:
- Properly configured TileMap nodes for all the static visual elements and spikes
- An instance of a scene that makes the snow effect
- A level script in the base node with some default parameters for my levels

Every time I want to create a new level scene I can inherit from this one. Any change I make to the base in the future gets reflected in all of the levels and I don’t even have to enable editable children to access the inherited nodes. Very neat and time-efficient.
Regarding the animated spikes:
Painting tiles to TileMap nodes is super fast – all it takes is a click - and super efficient - since you're not using nodes. This is very unlike node instancing, where you’ll have to open a menu or duplicate instances (which I did a lot for most of the platforms). Since Godot supports adding collision to tilesets right out of the box, I wanted to make a tileset for my animated, shiny spikes as well. But setting up animated tiles in Godot 3.X can be a pain (this is getting changed in Godot 4). There are several ways to do it and it turns out the least obvious one is the nicest.
If you use animated textures then you'll have to add all the frames of the animation as individual image files, and then add them to the animation one by one. They're a pain to change later on and overall just bloat the project. In my case I'd need 48 pngs for my spikes. It would be much nicer to have an animation editor like the one used to configure SpriteFrames resources for the AnimatedSprite2D node. But it is not possible to add SpriteFrames resources to my TileSet resources so I had to find another solution. Luckily I had already research this topic for a previous project and it turns out it is possible to animate atlas tiles using shaders - as done in this project: https://gotm.io/henry-software/pixelleveltest/.
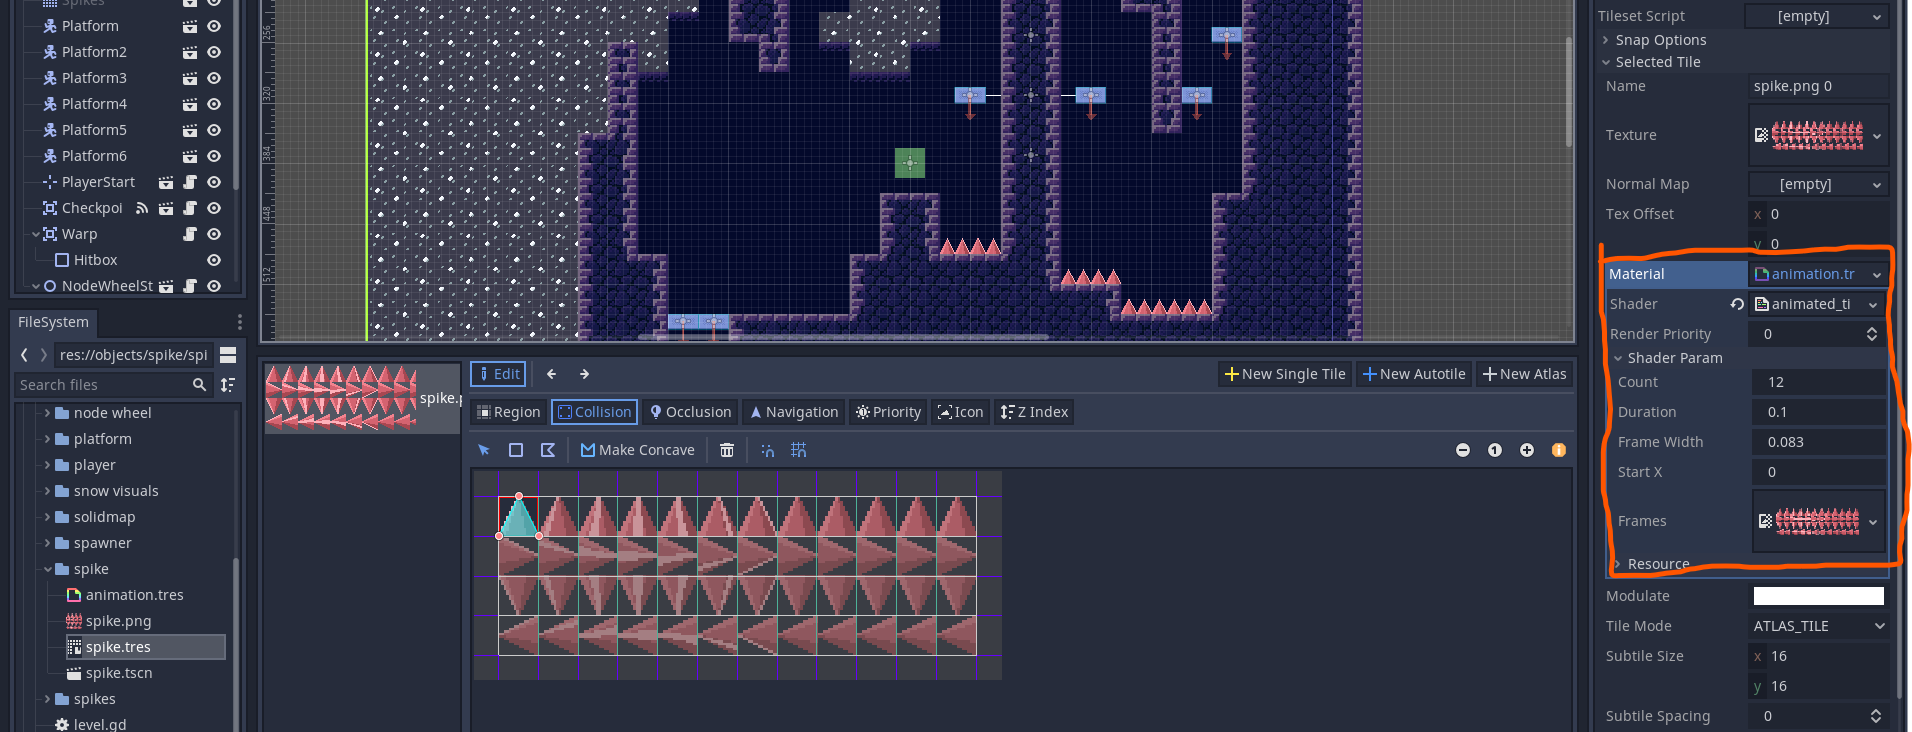
An atlas tile puts the whole selected region on a single texture, making it so you can sample the different frames using the TIME variable. The only trouble I ran into was that my passed uniform parameters weren't precise enough for the texture to be sampled pixel perfectly. It would offset by one pixel mid-animation. So I customized the shader to floor the sampled pixel coordinates and it worked perfectly afterwards. Now I could have a single image file with the spikes, and easily create an animation using the tileset editor which is much easier to work with than the AnimatedTexture resource.

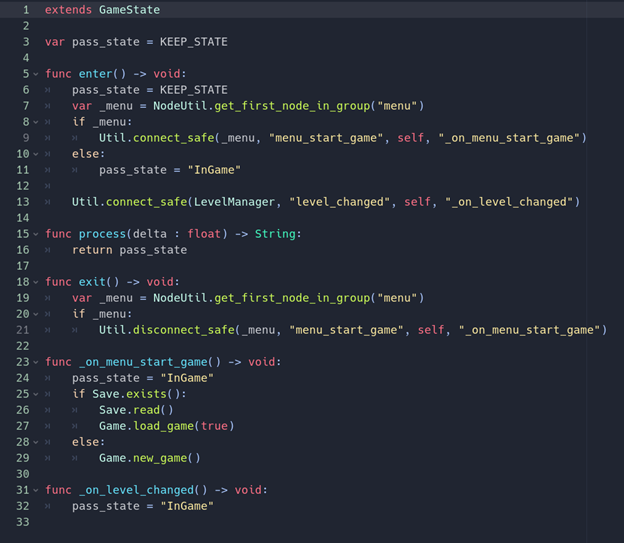
State pattern (https://gameprogrammingpatterns.com/state.html):
It is uncanny how much I ended up using the state pattern to organize my code. I used it for almost everything that needed multiple behavioral changes over the course of the game. The player, enemies, wheel, and even the menu and game manager made use of it.

In the beginning I lost some time because I realized I wanted to port already-existing code to use state machines. But once I got used to thinking in terms of state machines it started saving me time instead. For every new slightly complex node I made I considered using the state pattern before diving into scripting the behavior. It became simpler to predict the outcome of my code, and it was overall simpler to debug as it became much more self-contained. For a game jam or rapid prototyping it is a very powerful tool to quickly program complex behavior into a single object without having to rely on a bunch of if statements checking boolean variables - which gets messy real fast.
In the long run I would use this approach with a bit more care. It has certain shortcomings that potentially makes it unfit for use in a lot of contexts - such as having object A change the state of object B: Since the states themselves handle state changes based on internal logic by returning the name of the next desired state from their process function to the state machine object (that was a mouthful). Having an outside instance change another instance’s state can easily lead to errors, especially if the state machine implementation utilizes pushdown automata (a fancy term for a state stack). I worked around this problem by connecting the states to signals, thereby keeping their logic contained within their script. This approach involved creating a variable inside the state script that holds the string for the returned state. The signal callbacks could then affect the state change by setting the string. (pass_state variable in the image example)
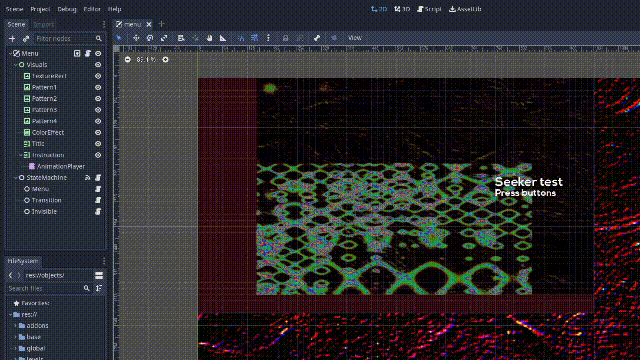
The menu:
I wanted to make something cursed-looking. Some shaded TextureRect and ColorRect nodes later and I had something I couldn't have predicted. But it was stimulating to look at, and time was of the essence, so I moved on. The reason I'm writing this is because the menu looks pretty funny and broken in the scene editor, and it is the first thing I see every time I open the project.
The future:
I was able to make a total of 6 small levels. Not enough for a whole game, but enough to see how the wheel fares in a linear platforming context. For a proper demo I would have liked to have at least 12 levels, and an ending of some sort. But that’s not what I was aiming for in the first place. The reason I went off course was because I realized I was ill-prepared and had too little time. I initially wanted to try my hand at generated levels and that’s what I’m going to aim for going forward. For the 9th of September I’m going to try to have a demo featuring level generation ready for a local game testing event. Additionally, I’d like to flesh out the elements of the game’s world a bit more. That way I have a clearer vision for the game's vibe in mind as I keep on working on it.
When the time comes, I will start posting more updates here and probably tweet about the status of the game. Follow me there if you’re interested in the game’s development. Until then, cya o/
- Synthas
Twitter: https://twitter.com/SynthasA
Source code GitHub: https://github.com/Synthasmagoria/Project-Seeker/
Day specific source code: https://mega.nz/folder/9qY2GKBL#BvoQMohs3OS_5IH0IjhMRg
Leave a comment
Log in with itch.io to leave a comment.